각 블럭의 높이를 줄여 공간을 확보 하였고 , 가시의 갯수가 많아 게임이 너무 어려워 1개로 듬성듬성 배치하기로 함
2.블럭 끼리 겹치지 않게 구현 - BlockSpanwer에서 생성 로직 변경 필요
코드를 따로 변경하진 않았고, 블럭의 속도를 전부 똑같이 통일 하였다.
전부 똑같이 변경한 이유는 게임이 [점프킹] 같은 점프 시스템을 가져왔다보니
블럭들의 속도가 종류에 상관없이 일정해야 게임의 난이도가 좀 나아질것 같다.
3. LV에 따른 스테이지 난이도 변경
BlockSpanwer.cs
using System.Collections;
using System.Collections.Generic;
using UnityEngine;

public enum defineNum
{
    Blokc_End_posX = -17, //해당 x좌표에 닿으면 pivot이 닿으면 사라지는 좌표
}

public class BlockSpawner : MonoBehaviour
{
    [SerializeField] List<Block> block_list;
    [SerializeField] float blockSummonCoolTime = 2.0f;

    [SerializeField] float startPosX = 17.0f; //생성 시작되는 위치 x좌표
    [SerializeField] float startPosY_Min = -5.0f;
    [SerializeField] float startPosY_Max = 2.0f;

    Coroutine coroutineBlockSpanw;
    [SerializeField] List<float> blockSpawnPosY;

    [SerializeField] bool isstop = false;

    int isSpawnBlockIndex = -1;

    public void BlockSpawnerON()
    {
        if (!isstop)
        {
            if (coroutineBlockSpanw == null)
            {
                coroutineBlockSpanw = StartCoroutine(BlockSpanw());
            }
            else
            {
                StopCoroutine(coroutineBlockSpanw);
                coroutineBlockSpanw = StartCoroutine(BlockSpanw());
            }
        }
    }

    public void BlockSpawnerOFF()
    {
        if (coroutineBlockSpanw != null)
        {
            StopCoroutine(coroutineBlockSpanw);
        }
    }

    IEnumerator BlockSpanw()
    {
        float LevelSuummonCoolTime;

        while (true)
        {
            MakeBlock();

            //현재 레벨의 10% 만큼 블럭 생성주기 증가 -> 블럭이 늦게 등장함
            LevelSuummonCoolTime = blockSummonCoolTime + ( (GameManager.Instance.CurLevel - 1) *  0.1f);

            yield return  new WaitForSeconds(LevelSuummonCoolTime);
        }
    }

   private void MakeBlock()
    {
        //블록 생성확률이 100% 에서 75%까지 떨어짐
        //생성확률은 6레벨 이하까지만 적용 그 이후로는 50% 동일
        int curStageLv = GameManager.Instance.CurLevel;
        int SuumonPercent = curStageLv >= 5 ? 5 : (curStageLv - 1);

        if (SuumonPercent <= Random.Range(0, 20))
        {

            int type = Random.Range(0, block_list.Count);

            Block block = Instantiate(block_list[type]);
            block.gameObject.SetActive(false);

            float x = startPosX;
            //y 범위 : -4.5 ,-1.5,1.5, 4.5

            //한번 생겼던 위치에 다시 생기지 않는 함수
            int y;
            do
            {
                y = Random.Range(0, blockSpawnPosY.Count);
            }
            while (isSpawnBlockIndex == y);
            isSpawnBlockIndex = y;


            block.Block_pos = new Vector3(x, blockSpawnPosY[y], 0);
            //레벨 수치의 10% 만큼 모든 블럭의 speed 증가
            if (curStageLv > 1) block.Speed += (curStageLv * 0.1f);
            block.gameObject.SetActive(true);
        }
    }
}
블럭 생성시 게임매니저에서 현재 스테이지 레벨을 호출 하여 블록 생성 확률,블록 생성 주기,블록 이동 속도수치를 조절하게 함.
4. 블럭에 빠지는 함정 만들기(함정 특징: 땅바닥인척 하지만 갑자기 내려감)
1.좌우로 이동하는 블록 추가
BlockGroup.cs
using System.Collections;
using System.Collections.Generic;
using UnityEngine;

public class BlockGroup : Block
{
    [SerializeField] protected List<GameObject> blocks;

    private void Update()
    {
        MoveBlock();
    }
}
MovePattern.cs
using System.Collections;
using System.Collections.Generic;
using UnityEngine;

public class MovePattern : MonoBehaviour
{
    [SerializeField] float avoidSpeed = 2.0f;

    int dir = 1;
    private Vector3 originPos;
    private float moveRange = 1.0f;

    private void Start()
    {
    	//처음 위치 좌표 저장
        originPos = transform.localPosition;
    }

    private void Update()
    {
    	//이동거리(MoveRange) 이상 이동한경우 방향값(dir) 변경
        if(Mathf.Abs(transform.localPosition.x - originPos.x) >= moveRange) dir *= -1;

        transform.localPosition += dir * ((Vector3.right  * avoidSpeed)) * Time.deltaTime;
    }
}
좌,우로 왔다 갔다 하는 패턴을 만들때 왼쪽/오른쪽 좌표로 설정해도 되지만
조건문을 이동거리(MoveRange)로 사용하면 좌표 값을 건드리지 않고 이동거리로 제어가 가능해져서 유용하다.
2.밟으면 떨어지는 블록 추가
DropPattern.cs
using System.Collections;
using System.Collections.Generic;
using UnityEngine;

public class DropPattern : MonoBehaviour
{
    [SerializeField] float DropSpeed = 0.5f;

    private void OnCollisionEnter2D(Collision2D collision)
    {
        if(collision.gameObject.CompareTag("Player"))
        {
            StartCoroutine(Drop());
        }
    }

    IEnumerator Drop()
    {
        while(transform.position.y >= -12f)
        {
            transform.position += Vector3.down * DropSpeed * Time.deltaTime;
            yield return null;
        }
    }

}
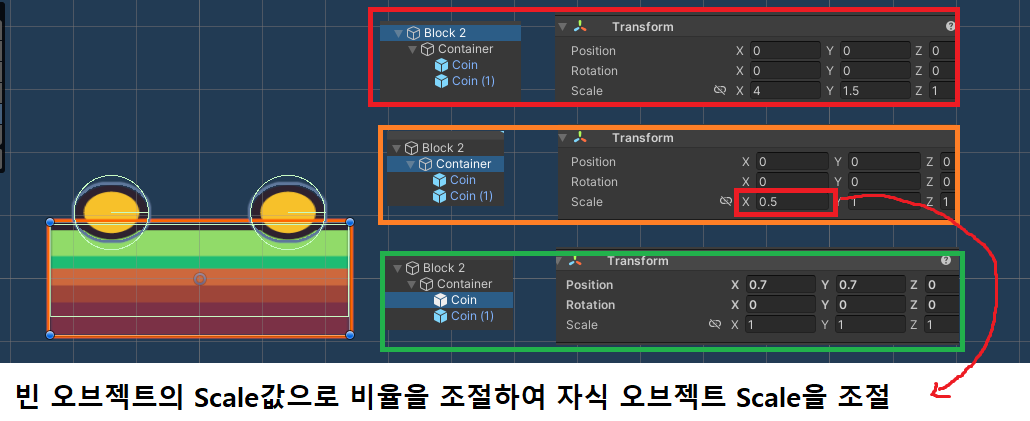
위에 블럭들의 콜리더 분리가 필요해서 부모 오브젝트를 만들고 자식으로 3개의 블럭을 추가하였다.
각 블럭마다 콜리더를 추가하였고 기믹이 필요한곳에만 스크립트(MovePattern.cs , DropPattern.cs)를 넣어서 사용 하였고 3개의 블럭은 동시에 같은속도로 같이 이동해야 되기때문에
새 스크립트인 BlockGroup 스크립트를 만들고 Block을 부모로 상속하여 이동하는 함수를 사용하였다.
4-1. Player 점프 로직 변경(떨어지는 블럭 위에 있을때 점프 가능하게)
떨어지는 블럭에 캐릭터가 서있으면 OnColliderEnter() 메서드가 자꾸 호출하여서 점프가 안되는 버그가 있었다.
Collider 함수 안에 점프상태를 초기화하는 내용이 있음
대처방법으로 콜리더가 호출 되더라도 점프 상태인 경우에만 점프상태를 초기화 할 수 있게 로직을 변경하였음
떨어지지만 게이지는 초기화 되지 않기 때문에 점프가 가능해짐
Player.cs
    private void OnCollisionEnter2D(Collision2D collision)
    {
        if (collision.gameObject.CompareTag("Block"))
        {
            // 캐릭터가 점프 + 점프중 이라는 상태를 만족해야만 멈춤
            if (isJump && isJumping)
            {
                PlayerStop();
                anim.SetBool("isJump", false);
            }
        }

        if (collision.gameObject.CompareTag("Spike"))
        {
            Debug.Log("Player 가시 닿음");
            isdead = true;
            anim.SetBool("isDead", true);
            PlayerStop();
            GameManager.Instance.PlayerDie();
        }
    }
이유 : 게임을 플레이 해보는 도중 경계선에 있으면 캐릭터가 화면 밖에 있을때 조작이 잘 되고있는지 못하는 불편함을 느껴 추가하기로 하였다.
하지만 카메라가 오브젝트를 추적 할 수있는 메서드를 몰라 구글링 및 ChatGpt의 도움을 받아 추천 받았다.
카메라 안에 있는 특정 오브젝트를 찾는 방법은 2가지를 알았다.
1-1.첫번째는 Camera.WorldToViewportPoint' 메서드를 사용
해당 메서드는 월드 좌표를 뷰 포트 좌표로 변환해주는 역할을 한다.
ViewPort란 좌측하단(0,0) 에서 우측상단(1,1)을 가르키는 좌표계이다. 최소(-1,-1) 에서 최대 (2,2)까지 값을 가진다.
즉,카메라가 보는 영역인 ViewPort 좌표계에 Player 월드좌표를 변환 시켜서 사용 하는것이다.
    public float originSize = 6.87f;
    public float targetSize = 15f;  // 목표로 하는 Orthographic Size
    public float zoomSpeed = 5f;   // 줌 인/아웃 속도

    void ObjINCamera() //해당 메서드를 Update()에 포함 시킴
    {
        // 오브젝트의 월드 좌표를 뷰포트 좌표로 변환
        Vector3 viewportPos = Camera.main.WorldToViewportPoint(transform.position);

        // 뷰포트 좌표가 카메라의 시야에 있는지 확인
        if (!(viewportPos.x >= 0 && viewportPos.x <= 1 && viewportPos.y >= 0 && viewportPos.y <= 1 && viewportPos.z > 0))
        {
        	Debug.Log("오브젝트는 카메라의 뷰 밖에 있습니다.");
            Camera.main.orthographicSize = Mathf.Lerp(Camera.main.orthographicSize, targetSize, Time.deltaTime * zoomSpeed);

        }
        else
        {
        	Debug.Log("오브젝트는 카메라의 뷰 안에 있습니다.");
            Camera.main.orthographicSize = Mathf.Lerp(Camera.main.orthographicSize, originSize, Time.deltaTime * zoomSpeed);
        }
    }
이런식으로 하면 Lerp 함수를 통하여 자연스럽게 화면이 Zoom기능이 구현된다.
1-2.GeometryUtility.TestPlanesAABB 메서드를 사용한 방법
GeometryUtility.CalculateFrustumPlanes 와 GeometryUtility.TestPlanesAABB 두 메서드를 사용하는 방법이다.
카메라의 View frustum(절두체)에 오브젝트의 바운딩 박스가 포함되는지 확인 하는 방법이다.
절두체는 카메라가 실질적으로 비추는 3D 공간이라 생각하면된다.
즉, 절두체에 오브젝트가 존재하는지 체크하여 Zoom 기능이 동작하는 코드이다.
using UnityEngine;

public class ObjectInCameraView : MonoBehaviour
{
    public Camera mainCamera; // 사용할 카메라

    void Update()
    {
        // 카메라의 뷰 프러스텀을 계산
        Plane[] planes = GeometryUtility.CalculateFrustumPlanes(mainCamera);

        // 오브젝트의 바운딩 박스를 얻음
        Bounds objectBounds = GetComponent<Renderer>().bounds;

        // 오브젝트의 바운딩 박스가 카메라의 뷰 프러스텀 안에 있는지 확인
        if (GeometryUtility.TestPlanesAABB(planes, objectBounds))
        {
            Debug.Log("오브젝트는 카메라의 뷰 안에 있습니다.");
        }
        else
        {
            Debug.Log("오브젝트는 카메라의 뷰 밖에 있습니다.");
        }
    }
}
절두체는 컬링기법(그래픽 렌더링을 줄여 최적화하는 기법중 하나)을 사용할떄 주로 나타나는 이론이다.
string secretWord = "hangMan".ToUpper();
//C#에서는 string이 읽기 속성이기에 char[] 로 문자열을 관리해야된다.
//C#에서의 char[]과 string에 관련하여 TIL 작성하기
char[] guessWord = Enumerable.Repeat('_',secretWord.Length).ToArray(); // char[]을 '_'로 정답 글자수만큼 초기화하는 코드
int attepts = secretWord.Length;
bool wordGuessed = false;

string copySecretWord = secretWord;

for (int i = 0; i < attepts; i++)
{
    //char[] -> string 변환 코드
    string str = string.Concat(guessWord);
    //'_'가 포함되어있으면 false , 포함되지 않으면 true
    wordGuessed = !str.Contains('_');

    //게임 클리어
    if (wordGuessed)
    {
        Console.WriteLine("");
        Console.WriteLine("축하합니다!! 단어 " + copySecretWord + " 를(을) 완성하셨습니다!! ");
        Console.WriteLine("도전 횟수 " + i + "회에 통과하셨습니다!");
        break;
    }

    //게임 안내
    Console.WriteLine("도전 횟수 : " + (i+1) + "/" + attepts);
    Console.WriteLine("[ " + str + " ]");
    Console.Write("추측할 단어를 입력해 주세요 : ");

    //글자 입력
    string input = Console.ReadLine();

    //글자 입력 체크 - 한개의 글자 체크
    if(input.Length >= 2)
    {
        Console.WriteLine("");
        Console.WriteLine("두 글자 이상이 입력되었습니다. 다시 입력해 주십시오.");
        i--;
        continue;
    }
    //글자 입력 체크 - 글자 영문 체크
    else if ( !((input[0] >= 'A' && input[0] <= 'Z') || (input[0] >= 'a' && input[0] <= 'z')))
    {
        Console.WriteLine("");
        Console.WriteLine("영어가 아닙니다. 다시 입력해 주십시오.");
        i--;
        continue;
    }

    //글자 소문자 고정
    input = input.ToUpper();
    //입력된 글자가 어디의 자리인지 체크
    int result = secretWord.IndexOf(input);

    do
    {
        if (result == -1)//없는 경우
        {
            Console.WriteLine("");
            Console.WriteLine("해당 문자는 없습니다.");
            break;
        }
        else
        {
            guessWord[result] = char.Parse(input);
            char[] word = secretWord.ToCharArray(); //문자열을 수정 할 수 있게 char[] 로 변경

            word[result] = '_'; //맞춘 글자를 '_' 처리함
            secretWord  = string.Concat(word); //char[]를 문자열로 다시 수정함

        }

        result = secretWord.IndexOf(input);
    }
    while (result != -1);


}

if (!wordGuessed)
{
    Console.WriteLine("");
    Console.WriteLine("실패하셨습니다!! 정답은 " + copySecretWord + " 입니다!! 다음기회에...");
}
5주차 숙제 게임개발
Run & Jump - 프로토타입 설명
1.마우스를 누르면 캐릭터 머리 위에 파워 게이지가 표시됨
2.마우스를 놓으면 놓은 방향으로 캐릭터가 빙글빙글 돌아가며 발판들을 넘어감
3.이미 한번 착지한 발판은 점수 x , 발판을 처음 밟을때만 점수 증가
구현 해야될것
1.각종 플레이어의 플레이를 방해할 장애물 추가 필요(화면을 날라다니는 오브젝트,발판 위의 가시 등등)
2.날라오는 블럭들이 지금 완전 랜덤 범위라서, 규격화가 필요함 ( 블럭이 겹쳐서 나오면 캐릭터가 피할 곳이 없음
버그
1.자기 발 밑에 바닥이 있는 상태로 아래를 향해 발사하면 캐릭터 착지하지 못한 판정이 되서 조작이 불가함
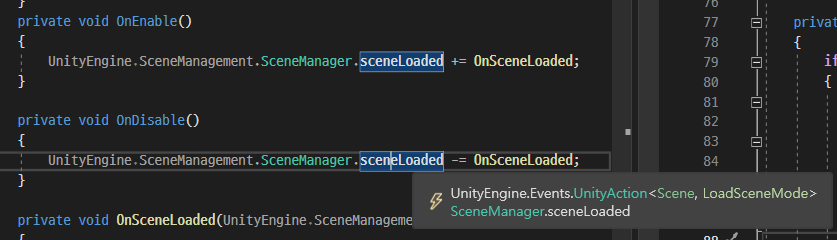
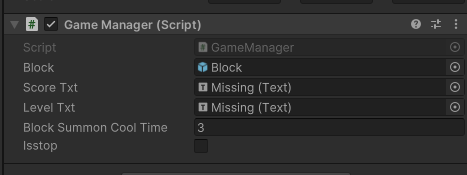
2.재시작(Scene 재로드)를 하면 GameManager에 있는 오브젝트들이 Mssing되어버림
싱글 톤 상태에서 Don'tDestroty를 했는데 Text 파일들이 Missing 됨
*Collider2D의 한 면만 충돌판정을 받게 하고 싶을때
//Blcok Class

private void OnCollisionEnter2D(Collision2D collision)
 {
 	 //플레이어한테 점수 부여가 안되있고 , 콜리더가 Player 태그일때
     if (!isScore && collision.gameObject.CompareTag("Player"))
     {

         foreach (ContactPoint2D contact in collision.contacts)
         {
             if (contact.point.y > transform.position.y + 0.3f)
             {
                 GameManager.Instance.AddScore(score);
                 isScore = true;
             }
         }
     }

 }
ContactPoint2D: 충돌 지점에 대한 정보를 나타내는 구조체로, 충돌한 두 물체의 접점 좌표, 충돌 방향(normal), 충돌 지점의 상대 속도 등을 포함합니다.
collision.contacts: 충돌이 발생했을 때, 해당 충돌에 관련된 모든 접점을 포함하는 배열입니다. 이 배열은 충돌이 발생한 각 접점에 대해 ContactPoint2D 객체를 담고 있습니다.
이 조건은 충돌 지점(Block의 윗면 = transform.positon.y +0.3f)의 y 좌표가 현재 객체(Player)의 y 위치보다 0.3 단위 이상 위에 있을 때만 참이 됩니다. 이 코드는 플레이어가 적을 위에서 밟았을 때 점수를 주는 식으로 사용할 수 있다.
using UnityEngine;
using UnityEngine.UI;
using UnityEngine.Advertisements;
using UnityEngine.SceneManagement;

public class RewardedAdsButton : MonoBehaviour, IUnityAdsLoadListener, IUnityAdsShowListener
{
    //[SerializeField] Button _showAdButton; //버튼 오브젝트에 적용시킬거면 여기에 넣어 쓰면됨
    //나는 글자를 버튼기능처럼 쓰려고 글자에 button 컴포넌트 넣고 주석처리함
    [SerializeField] string _androidAdUnitId = "Rewarded_Android";
    [SerializeField] string _iOSAdUnitId = "Rewarded_iOS";
    string _adUnitId = null; // This will remain null for unsupported platforms

    void Awake()
    {
        // Get the Ad Unit ID for the current platform:
#if UNITY_IOS
        _adUnitId = _iOSAdUnitId;
#elif UNITY_ANDROID
        _adUnitId = _androidAdUnitId;
#elif UNITY_EDITOR
   		_adUnitId = _androidAdUnitId;
#endif

        // Disable the button until the ad is ready to show:
        //_showAdButton.interactable = false;
    }

    // Call this public method when you want to get an ad ready to show.
    public void LoadAd()
    {
        // IMPORTANT! Only load content AFTER initialization (in this example, initialization is handled in a different script).
        Debug.Log("Loading Ad: " + _adUnitId);
        Advertisement.Load(_adUnitId, this);
    }

    // If the ad successfully loads, add a listener to the button and enable it:
    public void OnUnityAdsAdLoaded(string adUnitId)
    {
        Debug.Log("Ad Loaded: " + adUnitId);

        if (adUnitId.Equals(_adUnitId))
        {
            // Configure the button to call the ShowAd() method when clicked:
            //_showAdButton.onClick.AddListener(ShowAd);
            // Enable the button for users to click:
            //_showAdButton.interactable = true;
        }
    }

    // Implement a method to execute when the user clicks the button:
    public void ShowAd()
    {
        // Disable the button:
        //_showAdButton.interactable = false;
        // Then show the ad:
        Advertisement.Show(_adUnitId, this);

    }

    // Implement the Show Listener OnUnityAdsShowComplete callback method to determine if the user gets a reward:
    public void OnUnityAdsShowComplete(string adUnitId, UnityAdsShowCompletionState showCompletionState)
    {
        if (adUnitId.Equals(_adUnitId) && showCompletionState.Equals(UnityAdsShowCompletionState.COMPLETED))
        {
            Debug.Log("Unity Ads Rewarded Ad Completed");
            // Grant a reward.

            LoadAd(); // 광고 불러오기
            SceneManager.LoadScene("MainScene"); //광고 다 보면 메인 씬으로 이동하기
        }
    }

    // Implement Load and Show Listener error callbacks:
    public void OnUnityAdsFailedToLoad(string adUnitId, UnityAdsLoadError error, string message)
    {
        Debug.Log($"Error loading Ad Unit {adUnitId}: {error.ToString()} - {message}");
        // Use the error details to determine whether to try to load another ad.
    }

    public void OnUnityAdsShowFailure(string adUnitId, UnityAdsShowError error, string message)
    {
        Debug.Log($"Error showing Ad Unit {adUnitId}: {error.ToString()} - {message}");
        // Use the error details to determine whether to try to load another ad.
    }

    public void OnUnityAdsShowStart(string adUnitId) { }
    public void OnUnityAdsShowClick(string adUnitId) { }

    void OnDestroy()
    {
        // Clean up the button listeners:
        //_showAdButton.onClick.RemoveAllListeners();
    }
}
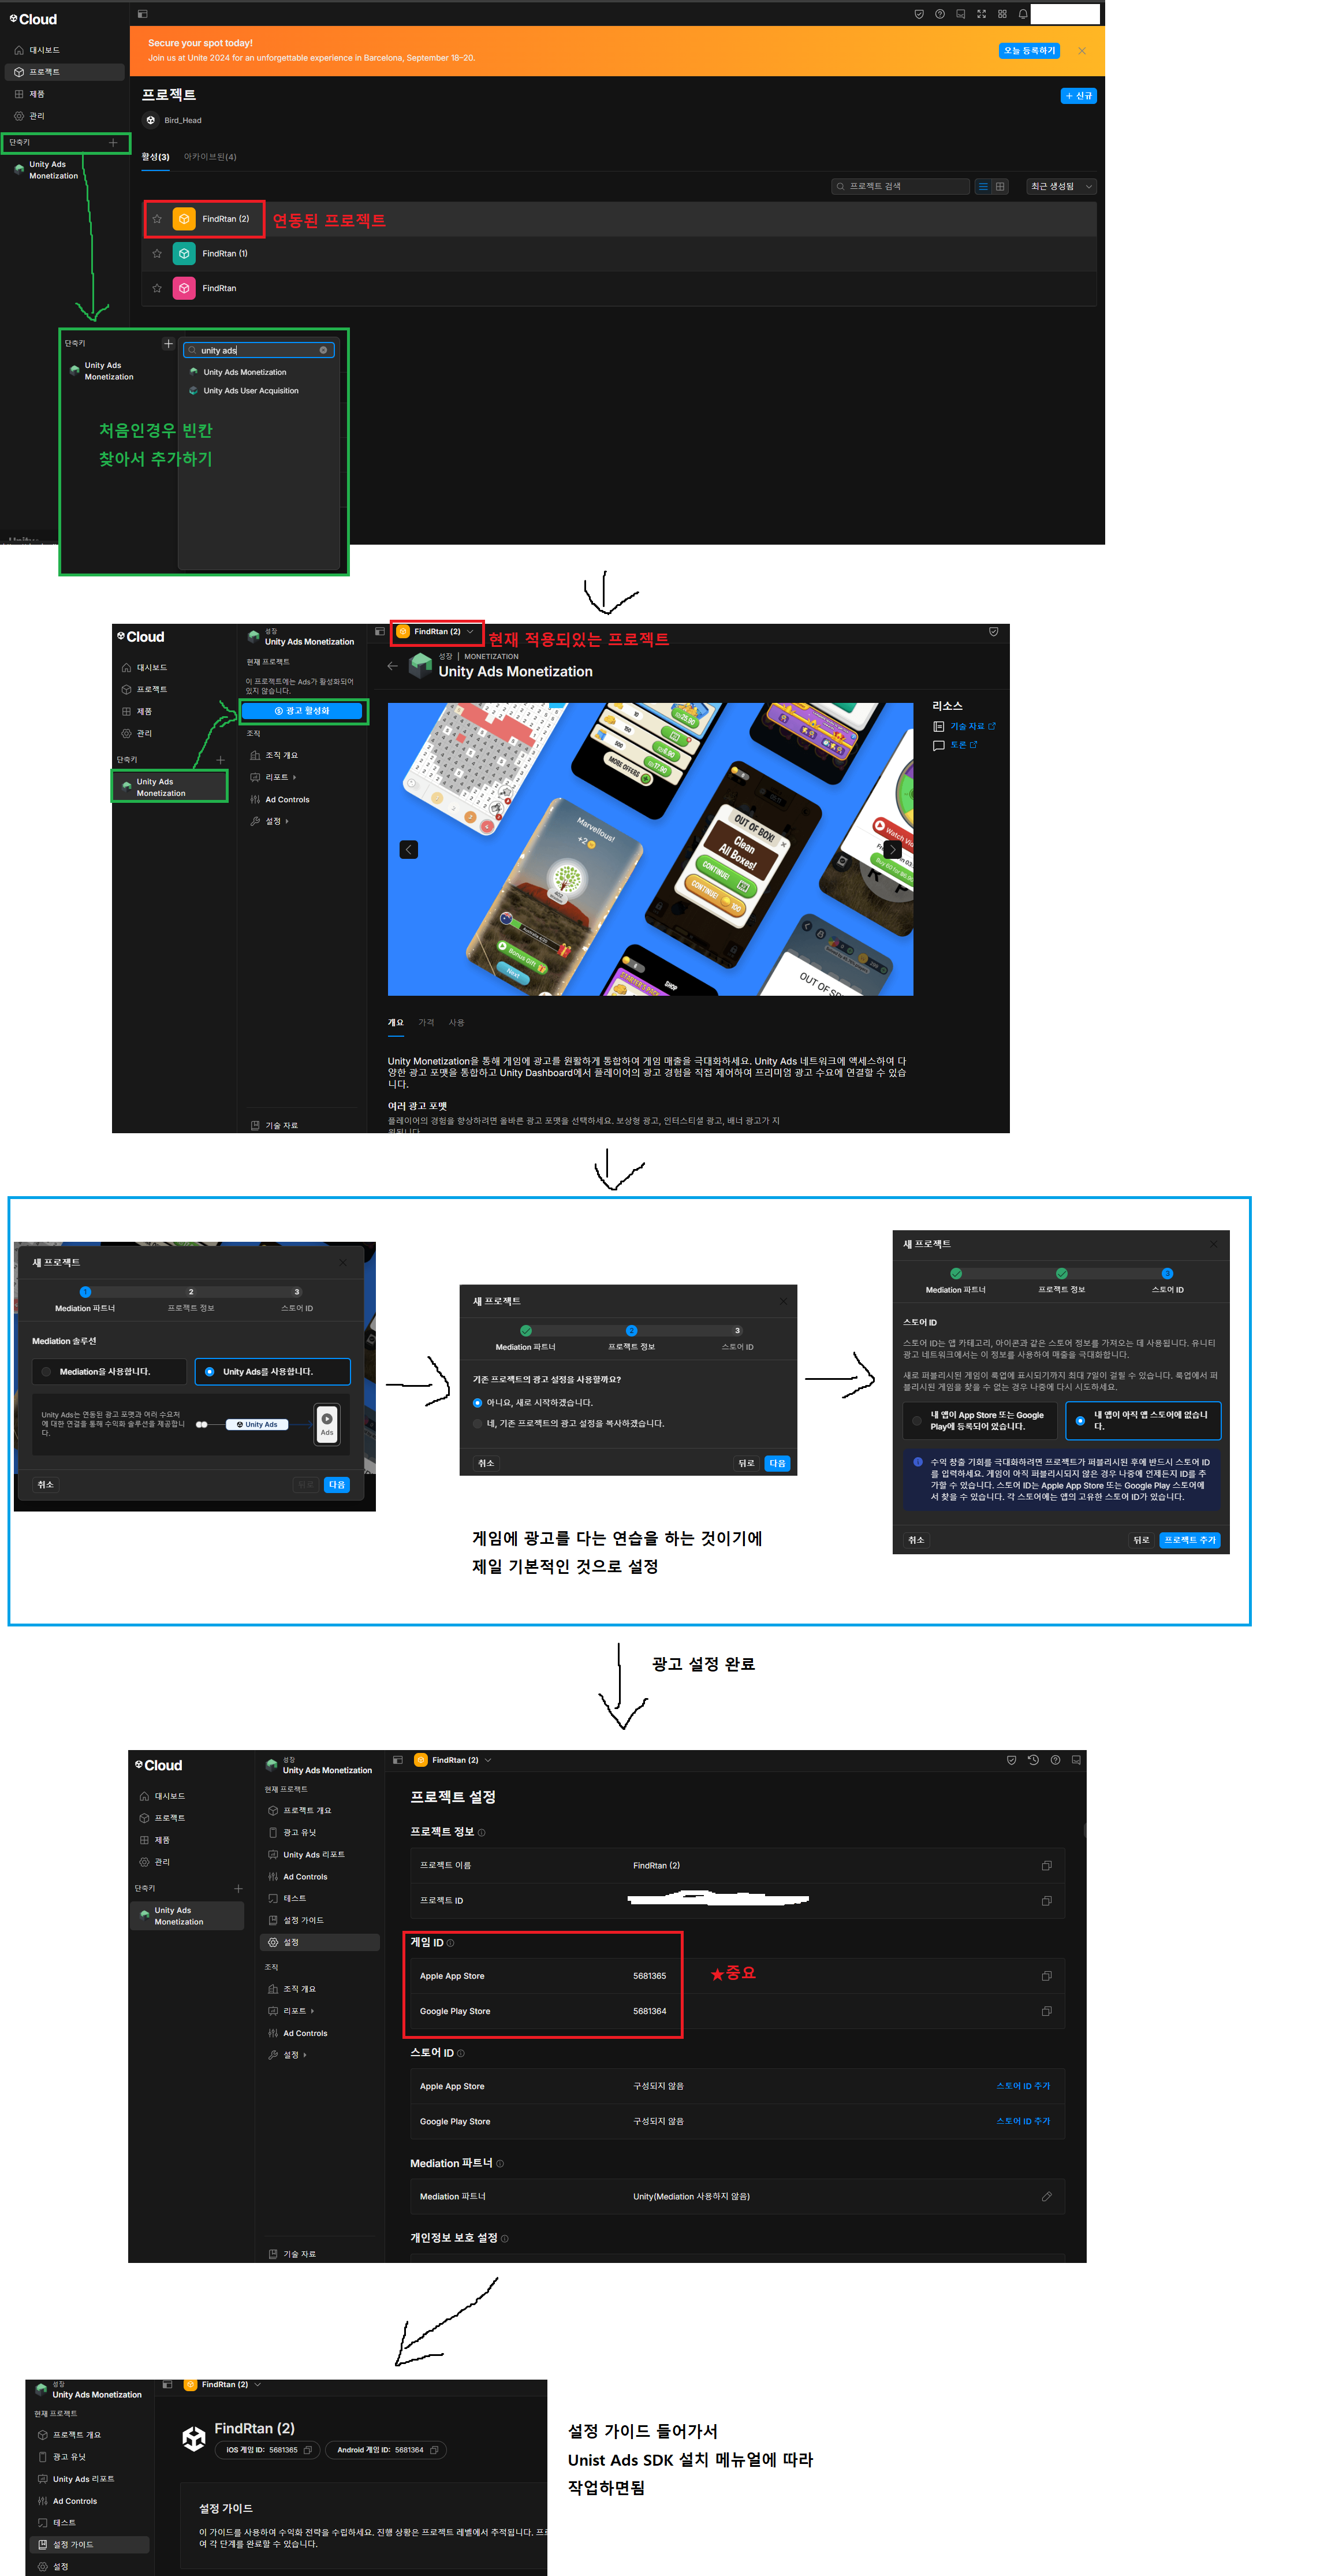
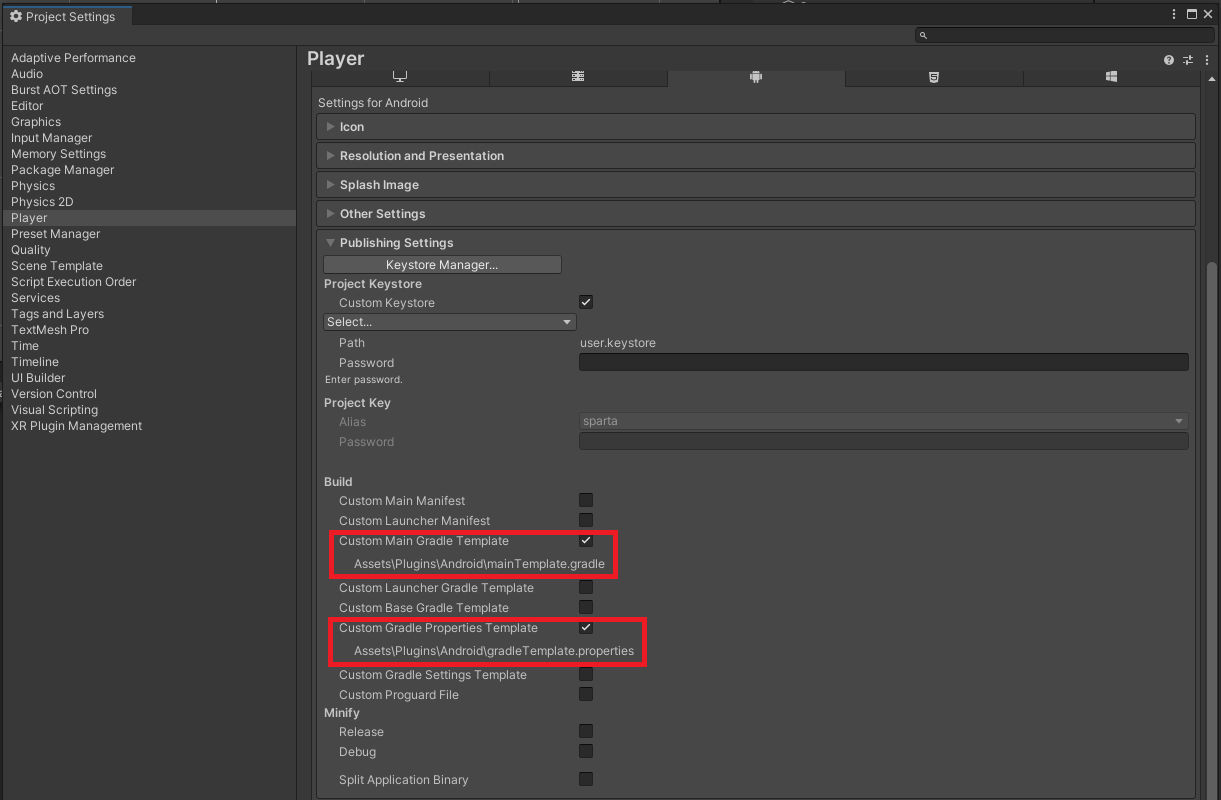
4.광고 추가하고 Build 오류 대처법
강의를 보고 광고를 추가 했을때 Build가 되지않아서 계속 터졌었다.
원인은 Build 시에 resolving android dependencies 가 자꾸 멈춰버리는 현상이 있었다.